dil·i·gence:careful and persistent work or effort

Proverbs 13: 4 The soul of the sluggard craves and gets nothing, while the soul of the diligent is richly supplied.


Sunday, January 29, 2012

$25 Goodwill table redo

I cannot tell you how happy I am to be posting this.  This table has been the most frustrating AND the most rewarding project to date.  Last winter during one of my frequent stops into our local Goodwill, I found this beauty:

A beautiful, sturdy, all wood antique (looking) pedestal table.  No, I wasn't looking for a new dining table (we already had 2 dining areas and 2 dining tables), but that didn't keep me from giving the table a good once over.  And, when I determined her to be in good structural condition, I sent out to find the little scrap of masking tape that I knew would have her asking price scribbled on it.  When I found it, I couldn't believe my eyes:  $25.  $25!!!  She was coming home with me, that was certain.  Immediately, I determined we were in desperate need of a game table in the basement.  And, we did use her down there for a good long time.

But then (as I do all too often to Colin's dismay), I initiated a weekend round of Musical Furniture, and our rectangular kitchen table moved to my office/craft room, and this gal moved into the kitchen.
See how cute she looked with the mismatched coffee sack covered thrift chairs and everything?  I was happy and she was happy until this happened:

See that large cloudy white area?  That's what you get when you put a hot pot on a wet cloth on top of a wooden table.  I tried everything to get it out.  I tried wood cleaner, wood conditioner, some trick with toothpaste, and finally a light sanding and touch up pen.  But, I decided the only real option was to give her a make over.

That's when I got nervous.  I've never stained a piece of wood before.  I've never stripped a piece of wood before.  Heck, I've never even sanded something like this down before!  My first phone call was to Dad because Dad is to DIY/home repairs as Mom is to sewing, and I've already expressed how good my mom is at sewing.  So, he talked me through the steps and even lended me his belt and orbital sanders.

So, one Saturday morning I was feeling ready to tackle the project and after 45 minutes of sanding, this is what I had:

Not a whole lot of progress.  And, all I kept thinking was, "Is this supposed to look this awful!?"

Plus, I was working alone doing something I had never done before, not knowing if I was going down the right path or destroying the table.  Even with the every 5 minute random googling of  'how to sand table' or 'how awful will it look' I didn't have much confidence.

And, then there is the issue with not knowing how to change the sand paper on the belt sander, but I won't bore you with those details.  Thankfully, my parents were due to be in town the very next day, and my dad provided me with me the moral support I needed.  We worked on it that night, and by bedtime, this is what we had.
 And then, the next day he continued to work on the table most of the day while I was at work.  By the time I got home, the table was totally sanded and ready for just its final once over.  At that point, I moved this project to the basement where I primed and painted the base and apron a crisp white.


Then, it was time for stain.  After only one coat of MinWax oil based stain in Jacobean, I was thrilled with the results.


 So, this is where the project got a little hairy.  I had moved the table upstairs so that I could ensure that the stain was evenly applied (it was) and add a protective finish.  I already had MinWax Polycrylic in semi-gloss on hand, so I decided to use that, knowing that I would need a half dozen or so coats before I would achieve the durable finish I was after.  The first coat went on swimmingly.  I allowed that to dry and sanded lightly with 220 grit sand paper (as per the instructions on the can).  Then, I applied a second coat.  I noticed immediately that it was going on with lots of streaks, but I figured it would level as it dried.  No such luck.  The streaks were permanent, and I've since read that this is common with water based poly.  It dries too quickly and doesn't have a chance to level.  Not to be deterred, I sanded again and tried another coat, but this one I applied with an old sock (instead of a synthetic paint brush as the can suggests).  This coat went on much better, but I am still not 100% sold on the finish.  At this point, I'm calling this project done-ish.  Monday morning, I will call the 800 number on the MinWax can and ask them for suggestions.  I have some ideas to try, but I want to see what they have to say for themselves (!!).  I have a feeling I will need to re-sand and finish with an oil based poly, but we'll see.

So, without further ado, I present to you the "finished" table!


Let's have a quick look back, shall we?  Then:

And, now:


xo,

Emily

PS- I will update this post with whatever I hear from the folks at MinWax.

**linking to the girls at


Thursday, January 26, 2012

Broken armoire door gets second life

There once was an Ikea armoire who lived a good life holding a large tv for a very long time.  But, then LCD tvs were invented, and the armoire was no longer needed.  But, it still had a job holding old linens and dog towels in the basement.  The armoire was very happy.  But, it knew it had more to give.  You see, the doors had been removed and were sitting dusty and dirty in a dark corner of the basement.  The door were removed for 2 reasons:
  1. Because one was broken, and 
  2. because it just didn't make sense to have only one door.
So, while the armoire was happy, the unused doors felt sad and dejected.

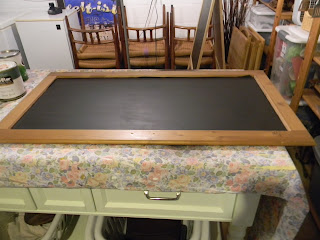
But, then one day, I took a look at that unused door and decided that we simply must use it for something!  It didn't take me long to decide that the door was begging to become a chalkboard.  So, I got out the trusty chalkboard paint and gave it 3 coats.

Once that was dry, the frame got a couple coats of the green that is on the backs of the living room bookcases.  The lovely door turned chalkboard now has a place of honor in the dining room.


She turned out perfectly, and I envision writing menus for dinner parties or seasonal messages up there (once the suggested drying time passes).

I just love free projects using broken items from around the house, don't you?  And, the door and the armoire lived happily ever after!

xo,

Emily


Update:  the drying time passed, and I've broken her in!  Just in time for a weekend full of out of town guests!


Monday, January 23, 2012

$1.18 art swaperoo

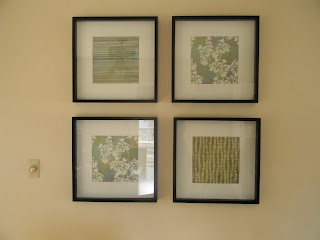
I had been growing tired of the framed red and floral craft paper in the dining room.


So, I bid them farewell.  A quick trip to Hobby Lobby and $1.18 plus tax later, and I had new art!


I am loving these colors so much more right now.  And, the beauty of it is that if I change my mind, I can swap the paper out again for next to nothing.

xo,

Emily

Saturday, January 21, 2012

"Oh, those old things?"

"...I just whipped them up one Saturday afternoon."

That's what I figured I would say when someone asked me about the curtain panels that are now hanging in my office.  The reality?  They were a tad more work than I thought.

I have been wanting to sew some curtain for my office/craft area, and I have been greatly encouraged by both the tutorials I have found all over the internet and by my budding sewing skills.  So, I figured picking out the fabric would be the hardest part.  I found this lovely floral/paisley-ish fabric at Joann's for $10/yard and 30% off.  So far so good.  I needed 5 yards, so for $35 I could have beautiful custom window treatments.


The first thing I did when brought the fabric home was clip it up on the already hanging rods to make sure I liked the colors, etc.  (Not that I had a plan of what to do with it if I didn't like the fabric in the office, but you know.)  Oh, and the fabric was already in 2 2 1/2 yard pieces, because it came from 2 different bolts.  Yes, there was a minute (or 10) of panic at the cutting counter when we discovered the first bolt had only about 4 1/2 yards of fabric on it when I needed 5.  But, we found another bolt with exactly 2 1/2 yards, so I got 2 pieces- each 2 1/2 yards in size.  The fabric cutting lady said I must be a good girl to have things work out so perfectly.  Meanwhile, I was wondering if I really wanted to use all my good luck on fabric, but oh well.  So, when I got them in the office with the already yellow walls and various other things that already live in there, it was love.


Yep, it was perfect!  Here's a picture I snapped before I had done any sewing at all.  Just raw fabric clipped onto the curtain rod and puddled on the floor.  I actually didn't think it was half bad, haha.

But, I knew I needed and wanted them to be finished properly.  So, I decided to hem all four sides all nice and neat.  Of course, any successful sewing project begins with a call to my mom, so I made sure to consult her about where to start.  Since I was going to be using clips and didn't need any rod pockets or anything fancy, I wasn't sure if there was an advantage to hemming the top/bottom first or the sides first.  She confirmed my suspicions and said that it didn't matter.  I figured the top would be hardest, so I started there.  When it came to evening out the cut edge so my curtains would hang straight and not be all wonky, I kind of just winged it.  I made sure to mark the line and iron it very well.  I even did the double fold thing where you keep the raw edge from being visible.  Go me.

Seeing as how I am not a sewer, I am very impressed with myself.  They're not perfect, but they look pretty sweet from a distance.  Oh, and they hang straight which is always a bonus.


So, once I hemmed the top, I cut the selvage off the edges, and zipped up the sides.  Then, it was time to figure out how long they should be.  This was a really time consuming part of the process, which included me crouching on the floor with about 400 straight pins.  Finally, I did get it all pinned up, and I actually just pulled the ironing board over to the wall and ironed the hem while the curtains were still hanging.  But, I did take them down to sew that last hem.  And, here they are all hemmed up and hanging.


Aren't they purty?!  I even tried the trick when you put 2 sets of curtains on the same rod.  I already had the gauzey white ones from a million years ago from Ikea, so I hung them on the same rod to the inside of my new panels, overlapping them with a couple clips.  The white curtains give the windows a bit more interest and soften the edges a little.  So, yeah, I totally love them, I'm glad I got them up and that I blogged about it.  The part I didn't tell you yet, though, is that I've only done one panel.  I didn't think I would stop after only one panel, but it took quite a while and I'm also in the middle of 2 other projects AND I have episodes of Grey's Anatomy and Private Practice to watch.  Priorities, people!  I hope to get the other done tomorrow.  Maybe once I do, I will show off the whole office, which has been undergoing quite a few changes lately!

So, all in all, I am glad I sewed myself some curtains.  But, it was time consuming and I found it to be somewhat tedious.  Frankly, I might- in the future- really just look for a reason to use the almighty drop cloth as window treatments like I have in my living room.

xo,

Emily


Sunday, January 15, 2012

Boring tray gets facelift

Who says useful things in your house can't also be beautiful?  This tray from Ikea has popped around our house for years and has probably found itself in just about every room at one time or another.
And, there was absolutely nothing wrong with the tray in its whiteness.


I had been using it on the ottoman in our living room for magazines and drinks and stuff.

But, then I decided that with the white tray and the white faux sheepskin and the white bricks and the white bookcases, there was a bit too much white for my liking.  So, why not jazz up the tray?  I grabbed 2 pieces of craft paper from Hobby Lobby in my new favorite pattern.  They're the large square sheets- 20" square perhaps?  The width of the paper was about an inch shorter than the width of my tray, so in the interest of keeping things simple, I left a border of white around the edges.  I mod podged the first sheet of paper down, and then mod modged the other sheet right on top of it, overlapping wherever necessary to get the whole tray covered.

Then, at the seam of the two sheets of paper, I just mod podged a piece of ribbon over top of it to disguise it.  Easy peasy!
 I think the final product is just perfect!  A little pop of color is all I wanted, and that's just what I got.
 
Today's lesson:  never underestimate the power of craft paper and mod podge.  :)


xo,
Emily

**  linking up to the ladies at